Thursday, February 28, 2013
Demo Today!
I will be at the University of Oregon Bookstore on campus from 10 am to 5pm. Come visit me there!
Friday, February 15, 2013
Upcoming Events
 Asian Celebration
This weekend I will be doing demos at the Oregon Asian Celebration, in Eugene OR. Visit their website for more details. I can be found in the Youth Art Room, from about 2:30 to 4:30 or so each day.
Proudly Oregon
Feb. 28th I will be demoing all day at the University of Oregon Bookstore, from 10am - 5pm at their Proudly Oregon event. this is a showcase of companies, artists, and products from the beutiful state of Oregon. Don't miss it! There will be food, prizes, and more.
Art Contest
Check out the Copic Marker blog for information on our annual art contest in conjunction with the City of Eugene.
 10 Cities Only - New Color & Ink Workshops!
Are you ready to get inky? Brand new for 2013, our totally hands-on Copic Color & Ink Workshops are being offered in 10 exclusive locations.
Experience two consecutive days of coloring and creating. Learn more about coloring faces and hair, using the Copic airbrush system, doodling, and coloring on a variety of surfaces in these fun-filled workshops.
There are only eight remaining workshops this year:
Orlando, FL
Boston, MA
Calgary, AB
Toronto, ON
Chicago, IL
Indianapolis,IN
Portland, OR
Dallas, TX
Click to watch a video by workshop instructor Colleen Schaan:
Wednesday, February 13, 2013
When Pigs fly...

 Basic coloring tutorial
I realized it has been a while since I posted a basic coloring tutorial, so I figured you would love to see a project I made earlier this week for a quick birthday card.
I drew this image onto Xpress It Blending card with a 0.2mm Multiliner SP. Then I got into coloring.
I started by coloring the whole pig with a base of RV10. I used the brush end of the marker, and colored in circles, keeping all my edges wet so I didn't get streaking.
Be sure to keep clean scratch paper under your work at all times, even when coloring thicker cardstocks.
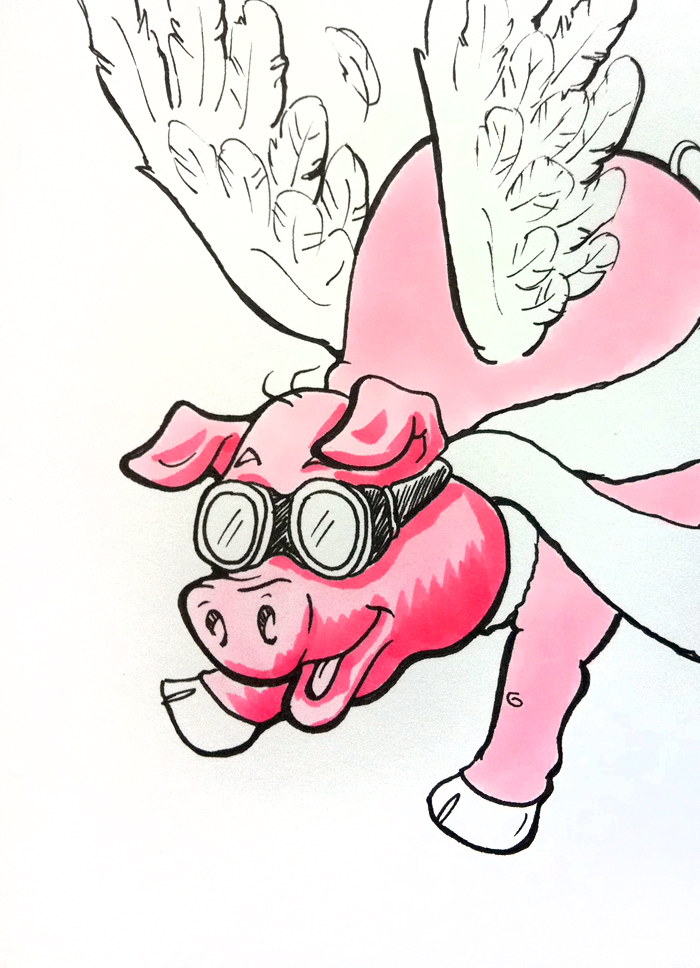
Notice that I flicked color in, darkest/heaviest on the shadow edge, then lifted up as I went into the lighter color. This will make it much easier to blend in the next step.
I did NOT color the whole pig at this time, because it is easier to blend if you go back when the marker is still a little wet. If the layers dry, you can still blend, but it is easier to get smooth blends while layers are damp.

Notice that I keep some shadows dark, and others I blend out more. The round, puffy cheek I blend, but the shadow under the goggles I keep with a crisp edge. This is because the shadow under the goggles is a cast shadow and has a crisp edge, whereas, the cheek is simply shaded to make it look round.

I chose this color because this is a gray/brown pink color and makes a nice shadow. Shadows are not as bright as the main colors. There are may ways I could have made a grayer shadow: I could have used a gray marker, I could have used a grayer RV color, or I could have added the compliment of pink, which would have been a greenish color.
In other words, experiment! Find color combos you like, then try them and see if they are realistic. Then, write down the colors you used so you remember in the future.

Close up, this looks rather odd. Trust me. It will look just fine on the finished project.
Once I get the colors looking right on his face, then I can color the rest of the pig using the same color scheme. Be sure to keep your shadows consistent! His shadow is on the right, on the underside, so as I color the rest of him, I need to keep all my darkest areas on the right/bottom areas.

In the shadows on the feathers, I added B12 and YG41. The scarf is colored with YG41, G82, and YG67, then I made it a little less vibrant by overlaying the warm gray marker.
Hooves are Y11, W1, and E04. Goggles are the same color as the wings. The leather is E13 and E04.
Remember how odd the green and yellow looked on the closeup of the face? Notice how it stops looking strange when you see the fully colored version.
Now look at the final card. The yellow and green almost seem to disappear, but the pig matches the background paper pretty well. I hope this basic rundown of my process helped. Have a great Valentine's Day!

Subscribe to:
Posts (Atom)